


MAXKOSKO WiFi Smart Floor Heating Thermostat, 16A Programmable Touchscreen for 120V/240V
20 in stock
Couldn't load pickup availability


Description
Smart WiFi Thermostat for Electric Floor Heating
Programmable touchscreen control for compatible 120V and 240V electric floor heating cables and mats.
- 120V / 240V: One thermostat supports either compatible voltage system.
- 16A Maximum: Controls resistive heating loads up to 16A.
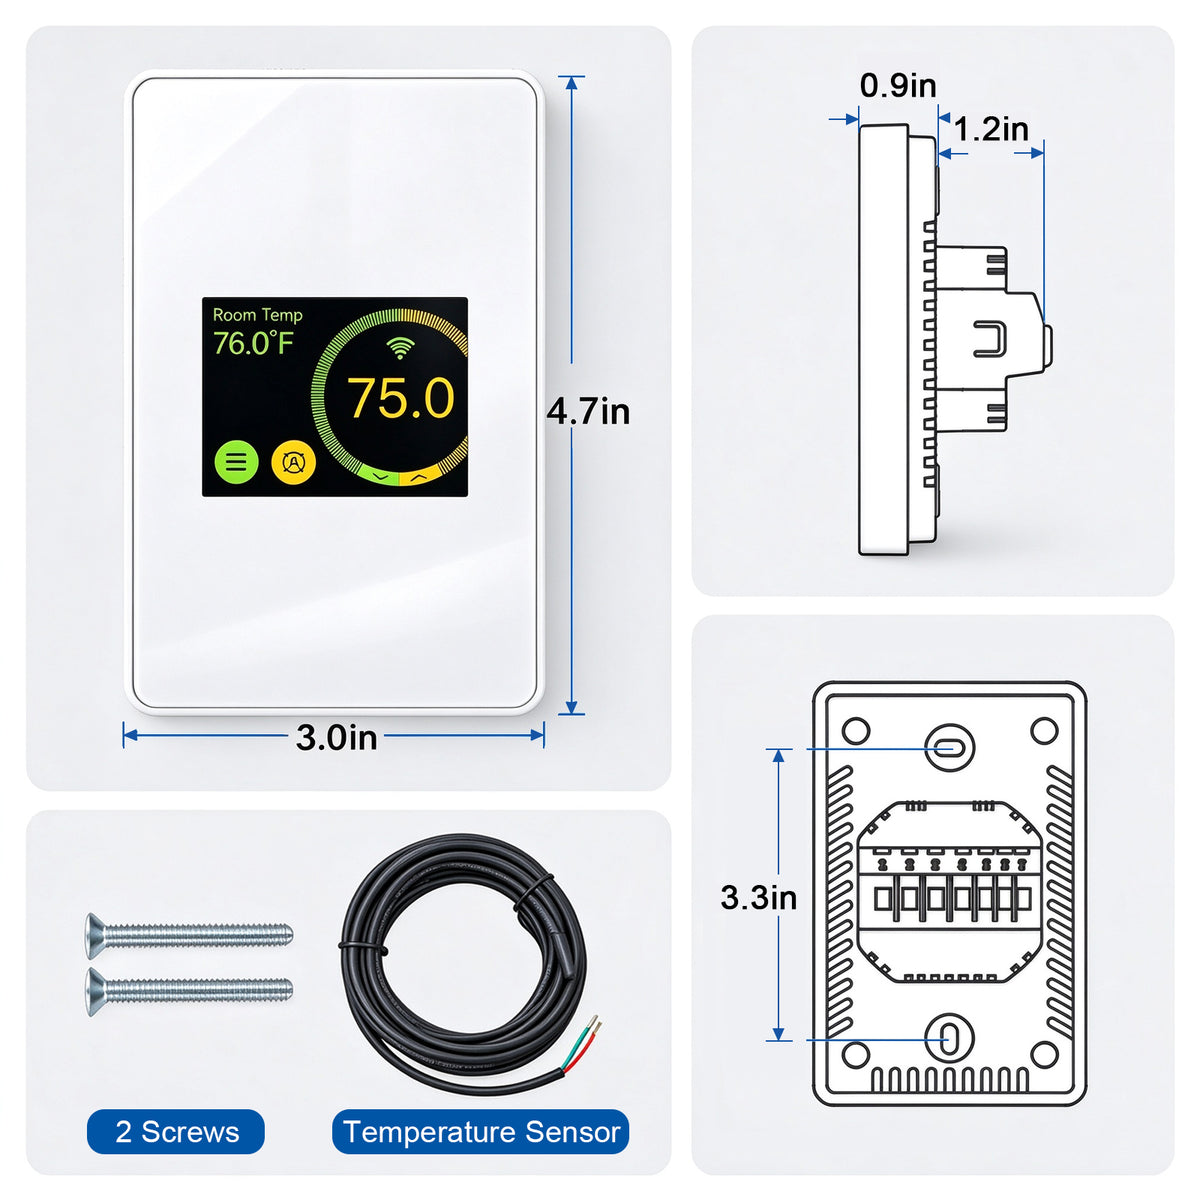
- Floor Sensor Included: Measures temperature inside the heated floor.
- Three Sensor Modes: Choose Floor, Room, or Both.
- Smart Control: Works with Smart Life, Alexa, and Google Assistant.
- Programmable: Choose 5+1+1 or individual 7-day scheduling.
- Professional Installation: Requires line-voltage wall wiring.
120V / 240V Compatible
Controls compatible electric floor heating cables and mats on either voltage system.
16A Resistive Load
Supports up to 1900W at 120V or 3800W at 240V.
Floor Sensor Included
Use the supplied sensor for accurate floor-temperature control and limiting.
Smart Life App
Adjust temperature, modes, and schedules from a compatible smartphone.
Voice Control
Supports compatible Alexa and Google Assistant voice commands.
Flexible Scheduling
Choose a 5+1+1 schedule or program each day separately.
Important Before Ordering
Confirm Your Heating System First
- Electric Floor Heating Only: Designed for resistive electric heating cables and mats.
- Not an HVAC Thermostat: Do not use with gas heating, heat pumps, low-voltage HVAC systems, cooling equipment, or motor loads.
- Confirm Voltage: Identify the actual 120V or 240V circuit before installation.
- Maximum Load: The combined floor heating load must not exceed 16A.
- Maximum Power: 1900W at 120V or 3800W at 240V.
- Larger Systems: Use a suitable contactor or relay when the heating load exceeds the thermostat rating.
- Hardwired Installation: This is not a plug-in thermostat.
- Qualified Electrician: Professional line-voltage installation is required.
- Ground-Fault Protection: Built-in GFCI protection is not listed in the supplied manual. Provide protection required by applicable electrical codes.
- Floor Sensor: Use the supplied sensor whenever possible.
- Wood Floors: Floor-sensor control and a suitable floor-temperature limit are required.
- WiFi: Smart Life pairing requires a 2.4 GHz WiFi network and Bluetooth-enabled phone.
- Indoor Use: Keep the thermostat away from water, moisture, dust, direct sunlight, drafts, and nearby heat sources.
Complete Your Floor Heating System
Use this thermostat with a compatible MAXKOSKO electric floor heating cable or electric floor heating mat.
Browse the complete MAXKOSKO Floor Warming collection for heating cables, mats, membranes, and controls.
Choose the Correct Sensor Mode
Floor Mode
Uses the external floor sensor to control heating according to the measured floor temperature.
- Recommended for most electric floor heating systems.
- Controls the target floor temperature directly.
- Uses the sensor installed between heating cable runs.
Room Mode
Uses the built-in sensor to control heating according to room-air temperature.
- Measures air around the thermostat.
- Does not directly monitor floor temperature.
- Thermostat location affects temperature accuracy.
Both Mode
Uses room temperature for heating control while the floor sensor limits maximum floor temperature.
- Recommended for temperature-sensitive floors.
- Helps protect wood, laminate, and vinyl flooring.
- Heating stops if the selected floor limit is reached.
Floor Sensor Placement
- Install the sensor inside the heated floor area.
- Position it between two adjacent heating cable runs.
- Do not allow the sensor tip to touch the heating cable.
- Do not route the sensor across a heating cable.
- Use suitable conduit when possible so the sensor can be replaced later.
- Follow the flooring manufacturer’s maximum temperature recommendation.
Replacing an Existing Floor Thermostat?
Check the Existing Floor Sensor
- Use the supplied floor sensor whenever the installation allows.
- Reuse an old embedded sensor only when its resistance type is known.
- Do not identify a sensor by wire color or appearance.
- An incorrect sensor setting may produce inaccurate floor temperatures.
- Incorrect readings may cause heating to stop too early or run too long.
10k Default
Select this setting when using the floor sensor supplied with the thermostat.
1-10k Sensor
For a compatible existing sensor with the corresponding resistance curve.
2-12k Sensor
For a compatible existing sensor with the corresponding resistance curve.
3-15k Sensor
For a compatible existing sensor with the corresponding resistance curve.
When the old sensor type cannot be confirmed, use the sensor supplied with this thermostat or ask a qualified electrician to test the existing sensor.
Specifications
| Model | ES49AW |
| Product Type | Smart WiFi Electric Floor Heating Thermostat |
| Rated Voltage | 120V / 240V AC, 60 Hz |
| Maximum Resistive Load | 16A |
| Maximum Power | 1900W at 120V / 3800W at 240V |
| Standby Power | 1W |
| Maximum Wire Size | 13 AWG / 2.5 mm² |
| Compatible Heating Systems | Resistive electric floor heating cables and mats |
| Control Methods | Touchscreen, Smart Life App, Alexa, and Google Assistant |
| Sensor Modes | Floor / Room / Both |
| Floor Sensor | External floor sensor supplied |
| Selectable Sensor Types | 10k-default / 1-10k / 2-12k / 3-15k |
| Floor Limit Range | 68°F to 122°F / 20°C to 50°C |
| Default Floor Limit | 95°F / 35°C |
| Temperature Calibration | Room and floor sensor calibration, ±9°F / ±5°C |
| Schedule Options | 5+1+1 or individual 7-day schedule |
| Operating Modes | Auto, Manual, Holiday, and Off |
| WiFi Requirement | 2.4 GHz WiFi |
| Temperature Display | °F or °C |
| Faceplate Dimensions | Approximately 3.0 × 4.7 in |
| Installation Height | Approximately 5 ft / 1.5 m above the floor |
| Listed Approvals | CE and UKCA |
| Installation Type | Indoor line-voltage wall installation |
Operating Modes & Daily Control View Modes Hide Modes
Auto Mode
Runs the heating system according to the selected weekly schedule.
Manual Mode
Maintains a fixed temperature until another mode or setting is selected.
Holiday Mode
Maintains a lower temperature while the home or office is unoccupied.
Off Mode
Stops normal heating control. Turning the thermostat off does not disconnect circuit power.
Temporary Adjustment
Change the temperature during an Auto Mode event without replacing the full schedule.
Child Lock
Prevents unintended touchscreen changes while heating continues with current settings.
Programmable Heating Schedule View Schedule Options Hide Schedule Options
Program automatic temperature changes for different times of the day.
5+1+1 Schedule
Weekdays share one schedule. Saturday and Sunday use separate schedules.
7-Day Schedule
Set a separate heating schedule for every day of the week.
Home Schedule
Includes Wake, Work, Return, and Sleep events.
Office Schedule
Includes Work and Return events for commercial routines.
Temporary Temperature Changes
- A temporary change applies only to the current scheduled event.
- The thermostat returns to the programmed schedule at the next event.
- Use Holiday Mode for longer periods away.
- Use Manual Mode when a fixed temperature is preferred.
Smart Features & Energy Settings View Features Hide Features
Adaptive Heating
Learns approximate warm-up time and may start heating earlier to reach the scheduled temperature.
Open Window Detection
Temporarily reduces heating when a sudden room-temperature drop is detected.
Anti-Freeze Protection
Helps prevent the controlled room or floor from becoming excessively cold when enabled.
Adjustable Brightness
Change standby-screen brightness for bedrooms, hallways, and nighttime use.
Energy Estimate
Uses entered heating load and operating time to estimate energy use.
Estimated Heating Cost
Enter the local price per kWh to view an estimated operating cost.
Energy Display Is an Estimate
- Enter the total wattage of the connected floor heating system.
- Enter the local electricity price per kWh.
- The thermostat estimates energy use from load and heating time.
- Displayed values may not exactly match the utility bill.
Smart Life App & Voice Control View Setup Hide Setup
Before Pairing
- Use a 2.4 GHz WiFi network.
- Turn on Bluetooth on the phone.
- Keep the thermostat close to a stable WiFi signal.
- Place the thermostat in WiFi pairing mode.
- Have the correct WiFi password ready.
1. Install Smart Life
Download the Smart Life app and register or sign in.
2. Open WiFi Connection
Use the thermostat menu to enter WiFi Connection settings.
3. Add the Device
Choose Add Device in Smart Life and select the detected thermostat.
4. Enter WiFi Details
Select the compatible network and enter its password.
5. Link Voice Control
Link Smart Life with Alexa or Google Home after app pairing is complete.
6. Keep Local Control
The touchscreen can still control heating if WiFi becomes unavailable.
Basic Installation Requirements View Requirements Hide Requirements
Installation must be completed by a qualified electrician according to the supplied wiring diagram and applicable codes.
1. Disconnect Power
Turn off the circuit at the breaker and verify that power is absent.
2. Confirm the Circuit
Identify the voltage, supply conductors, heating load, grounding, and protection.
3. Install the Floor Sensor
Place the supplied sensor between heating cable runs without touching the cable.
4. Complete the Wiring
Connect the supply, floor heating load, ground, and sensor according to the diagram.
5. Mount the Back Plate
Secure the thermostat back plate to a compatible wall box.
6. Complete First-Time Setup
Select the sensor mode, floor limit, schedule, and optional WiFi connection.
120V Wiring
- Confirm that the floor heating system is rated for 120V.
- Follow the 120V wiring diagram supplied with the thermostat.
- Do not exceed 16A or 1900W.
- Keep ground conductors properly connected.
- Provide required circuit and ground-fault protection.
240V Wiring
- Confirm that the floor heating system is rated for 240V.
- Follow the 240V wiring diagram supplied with the thermostat.
- Do not exceed 16A or 3800W.
- Identify both line-voltage conductors correctly.
- Keep ground conductors properly connected.
- Provide required circuit and ground-fault protection.
Thermostat Location
- Install approximately 5 ft / 1.5 m above the floor.
- Avoid direct sunlight.
- Avoid nearby heat sources.
- Avoid hot or cold drafts.
- Avoid moisture and water exposure.
- Avoid unusually hot or cold exterior walls.
- Location is especially important when using Room or Both Mode.
First-Time Setup Checklist View Checklist Hide Checklist
- Language: Choose the screen language.
- Location: Select Home or Office.
- Time and Date: Set the clock for schedules and energy records.
- Sensor Mode: Select Floor, Room, or Both.
- Floor Limit: Use the flooring manufacturer’s temperature requirement.
- Sensor Type: Select 10k-default when using the supplied sensor.
- Price per kWh: Enter the local electricity price for cost estimates.
- Load: Enter the total wattage of the connected heating cable or mat.
- WiFi: Connect to Smart Life if remote control is required.
All first-time settings can be changed later through the thermostat menu or Smart Life app.
Recommended Applications
- Electric radiant floor heating cables
- Electric floor heating mats
- Bathroom floor warming systems
- Kitchen and entryway floor heating
- Tile and stone floor heating
- Compatible wood, laminate, or vinyl floor systems with temperature limits
- Residential electric floor heating zones
- Compatible office and light commercial floor heating zones
- New floor heating installations
- Compatible replacement thermostat installations
Frequently Asked Questions
Does this thermostat work with both 120V and 240V floor heating?
Yes. It supports compatible 120V and 240V electric floor heating cables and mats. The actual supply voltage, wiring arrangement, and heating-system voltage must be confirmed before installation.
What is the maximum heating load?
The thermostat is rated for a maximum 16A resistive load, with a listed maximum of 1900W at 120V or 3800W at 240V.
What should I do if my floor heating system exceeds 16A?
Do not connect an oversized load directly to the thermostat. A qualified electrician may specify a suitable contactor, relay, or additional heating zone.
Can this thermostat control a furnace or heat pump?
No. It is designed specifically for compatible resistive electric floor heating cables and mats. Do not use it with gas heating, heat pumps, low-voltage HVAC systems, cooling equipment, or motor loads.
Does it include a floor sensor?
Yes. Use the supplied floor sensor whenever possible for accurate temperature control and floor-temperature limiting.
Can I reuse the floor sensor from my old thermostat?
Possibly. The existing sensor must match one of the thermostat’s selectable resistance types. Confirm its specifications or resistance values before reuse.
What is the difference between Floor, Room, and Both Mode?
Floor Mode controls heating from the external floor sensor. Room Mode uses the built-in room sensor. Both Mode controls room temperature while using the floor sensor to limit the maximum floor temperature.
Which sensor mode should I choose?
Floor Mode is recommended for most electric floor heating systems. Both Mode is useful when the flooring material requires a maximum temperature limit. Follow the floor heating and flooring manufacturer’s instructions.
Is WiFi required for the thermostat to work?
No. The thermostat can be controlled directly from the touchscreen. WiFi is required for Smart Life remote access and compatible voice-control functions.
Does it work with 5 GHz WiFi?
Smart Life pairing requires a 2.4 GHz WiFi network. A dual-band router can be used when its 2.4 GHz network is available.
Can I program a different schedule for each day?
Yes. Choose an individual 7-day schedule, or use the 5+1+1 option with one weekday schedule and separate Saturday and Sunday schedules.
Does the thermostat measure actual electricity use?
It estimates energy use from the entered heating load and accumulated heating time. The displayed estimate may not exactly match the utility bill.
Does this thermostat have built-in GFCI protection?
Built-in GFCI protection is not listed in the supplied manual. The floor heating circuit must have the ground-fault protection required by applicable electrical codes.
Can I install the thermostat myself?
Professional installation is required. This thermostat controls a line-voltage heating circuit, and the installer must verify voltage, load, wiring, grounding, protection, and applicable electrical-code requirements.
What do the E1 and E2 error codes mean?
E1 indicates a built-in room-sensor fault. E2 indicates an external floor-sensor fault. Turn off power and have the sensor wiring, connections, and selected sensor type checked.
Guides & Resources
Check Before Connecting Power
- Confirm that the system uses resistive electric floor heating.
- Verify whether the circuit is 120V or 240V.
- Keep the total heating load at or below 16A.
- Provide required grounding and ground-fault protection.
- Install the supplied floor sensor between heating cable runs.
- Confirm the sensor type before reusing an existing floor sensor.
- Select the correct Floor, Room, or Both sensor mode.
- Set the maximum floor temperature according to the flooring instructions.
- Use 2.4 GHz WiFi for Smart Life pairing.
- Have installation completed by a qualified electrician.
Read the complete ES49AW manual and floor heating system instructions before installation.